
SQL Server AlwaysOn Availability Groups feature is a high-availability and disaster-recovery solution introduced in SQL Server 2012 and later to enable you to maximize availability for MSSQL server databases.
With deep integration into SQL Server AlwaysOn technology, ScaleArc lets you harness the full capabilities of SQL Server 2012 and later without any app changes. ScaleArc provides automated failover across data centers and by replacing the AlwaysOn Availability Group Listener as the primary endpoint for SQL connections, ScaleArc can:
- Easily migrate load from one data center to another in the event of failure
- Reduce the failover time by automating the several steps in the failover process
- Lower application errors that result during failover
- Enable geo-aware load balancing for Read traffic
Follow these steps to set up AlwayOn server in ScaleArc for SQL Server 2012 or newer:
Prerequisites
- For proper AlwaysOn server discovery and failover operations, the ‘SQL Server Browser Service’ must already be running on each of the database servers. For more information, refer to this article on How to start and stop the SQL Server Browser Service.
- Complete setting up the network (make sure DNS and Search domain are set up correctly).
- Ensure the following if you have configured Kerberos authentication:
- For an AlwaysOn Availability Group to work with Kerberos authentication, configure a single domain service account to start the SQL Server services for all instances in the Availability Group.
- Register this service account with the
setspncommand on a Domain Controller in the domain; add this SPN to the Delegation properties of the machine account for any system (such as ScaleArc) that are accessed through Kerberos authentication.
- Note: The above requirements are documented here for SQL Server 2012, which also contains links to the documentation for SQL Server 2014 and 2016. They are requirements for all Kerberos-authenticated clients, not just ScaleArc.
- This Microsoft TechNet article provides detailed Step by Step instructions for Creating AlwaysOn Availability Groups in SQL Server 2016.
Steps to Configure AlwaysOn
-
On the ScaleArc dashboard, click the CLUSTERS tab > Add Cluster button.
-
Complete setting up the ScaleArc endpoints and database access.
- Locate Servers on the Create Cluster screen. This is the third panel on the screen.
- Select Cluster for Server Type and AlwaysOn from the dropdowns.
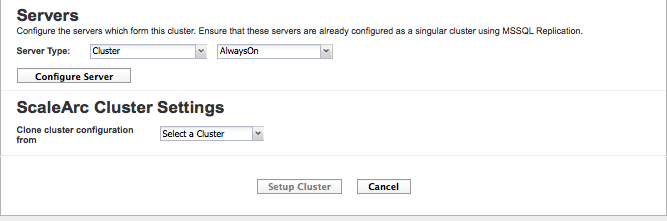
- Click Configure Server.
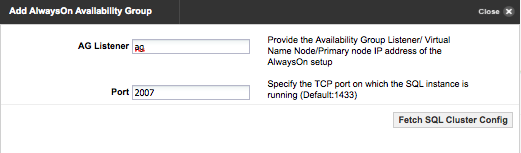
- Specify the Availability Group Listener/ Virtual Name Node/ Primary Node IP address of the AlwaysOn setup.
-
Click on Fetch SQL Cluster Config. This will connect to the Virtual Network Name (VNN) server and fetch all the databases which are configured for this cluster. ScaleArc truncates any database names that are too long. Hover on a database to see the full name.
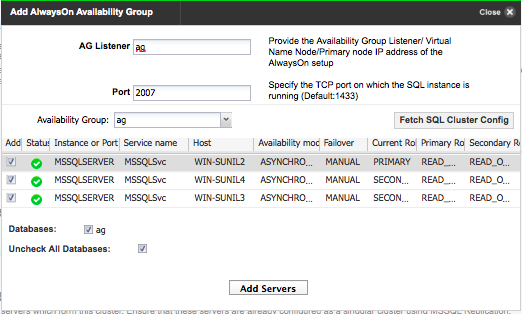
- Click on Add Servers to add the selected servers to the AlwaysOn Availability Group.
- The Start Cluster after Setup setting determines if the cluster is ON or OFF immediately following setup.
- Click Setup Cluster to complete the configuration.
- If you have incorrectly configured the settings, you may see an error alert.
- Click OK. Any error appears in the Configuration log section of the screen. Review the details and address the error to complete the setup. Note that you can also download a copy of the error to assist with further troubleshooting.

- Click Finish to set up the cluster.
- When completed, the system posts a notification.
- The cluster appears in the control panel of the dashboard. It displays the AlwaysOn configuration.
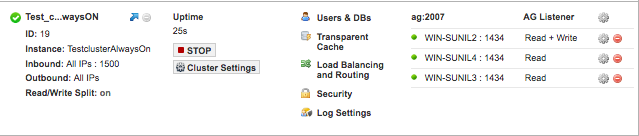
- If you selected the checkbox (default setting) to Start Cluster after Setup, the cluster's green icon indicates that the cluster is running. If you had deselected this option, the cluster icon is red, indicating that you need to explicitly start the cluster. Click START in the status column to run the cluster. The STOP button can be used to stop the cluster if necessary.